Bhuna Gosht Recipe | Tangy Bhuna Gosht Masala
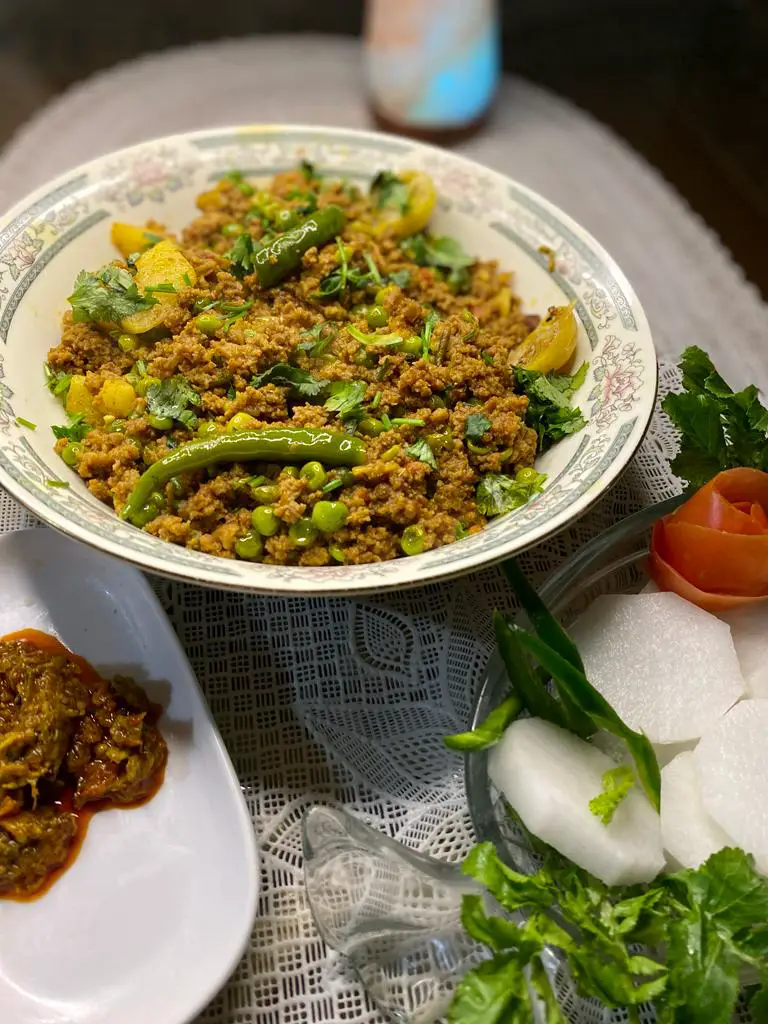
Bhuna Gosht masala is among those dishes that we often serve on invitations, ceremonies, and special occasions. The traditional look, vibrant hues, and delectable taste are what make this recipe so special for dinner.

Bhuna Gosht is one of the most common recipes cooked in almost every home in Pakistan. The overpowering aroma of curry, juicy beef pieces, and umami flavor makes this dish so delicious and indulgent.
This cherished recipe is so easy to make and you can customize it according to your flavor, but keeping things simple is the key here.
Just like the Dal Gosht recipe, Bhuna Gosht don’t need any kind of hard-to-find spices; the few basic ground spices, ginger, garlic, and tomatoes are enough to bring an authentic taste to Bhuna Gosht Masala.
I have been making this dish since my childhood, and I have learned a lot more tips from my mom to make it even more special for special occasions. So, if you’re craving zesty and umami Bhuna Gosht masala, today’s recipe is going to be your go-to culinary guide.

Why You Should Love Bhuna Gosht Recipe?
- A Flavorful Delight: Bhuna Gosht masala is a more flavorful delight. The gravy of tomatoes, garlic, and ginger penetrates the beef chunks, making them so succulent and tasty.
- Think Gravy: The thick and deep oily gravy of this recipe makes it a unique and soul-soothing delight. It pairs well with naan or roti.
- Easy To Make: No need to have any high-level skills for making this culinary. Yes! You heard that right; even all the ingredients that I’m going to use for this recipe are easily available in your kitchen.
- Nutritious: Nothing seems more nutritious than juicy beef chunks. It’s an enriched source of protein and iron and gives you an instant energy boost.
Which Meat Is Suitable: Beef Vs Mutton
Traditionally, Bhuna Gosht masala is made from beef meat. The mutton takes too much time to cook, and it’s not even as flavorful as beef meat.
You know that beef meat has some extra fat, making it softer and juicier, whereas goat or mutton lacks fat and takes longer to cook. But since in the UK beef meat has a shortage, in this scenario, you can use mutton.
If you’re using mutton ghost, you must add an extra amount of water to speed up the sautéing process.
Related Post: Last week, I made Dal Gosht with Dal Mash. Must check it out!
Ingredients:

- Ghost (Meat): I’m using beef meat for this recipe. I pre-boiled the meat in a pressure cooker. It takes nearly 45 minutes to pressure cook the meat in a cooker. You can also use a Instant-Pot for this process.
- Tomatoes: To add depth, flavor, and texture to the gravy, you must add the tomatoes. I didn’t use the food processor or chopper for mincing the tomatoes; just a knife is a good to cut them into pieces.
- Ginger & Garlic: Ginger and garlic are like a must-have ingredients for this recipe. These are super aromatic that wafts a delicious aroma in the kitchen. Plus, they add a more robust taste to this recipe. I use the mortar & pestle to get the minced version of both these ingredients.
- Green Chilis: The Bhuna gosht is more on the spicier side, and to make it a little fiery, the green chilis play an important role. I’m using the Jalapeño pepper; you can also opt for any available option.
- Onions: I’m using white onions; they add more umami and sweet flavor to the recipe and balance the spicy taste of the spices. There is no need to use any type of chopper; just a knife is enough to cut the onion into pieces.
- Cilantro: I will use this ingredient for the garnishing purpose. Sprinkling the fresh cilantro on the final version of the dish gives it a more professional look and elevates the texture.
- Spices: You need very basic spices for the Bhuna gosht. Spices include Turmeric powder, red chili powder, dry coriander, dry fenugreek, Kashmiri Red Chili (Optional), store-bought ghost masala, or instead it, you can use mixed masala.
- Garam Masala: Bhuna gosht is the more robust and overpowering recipe, and garam masala brings such characteristics to it. In garam masala, I’m using cumin seeds, cloves, black peppers, and black cardamom.
How To Cook Bhuna Masala?
- Boil The Beef: First, soak the beef and boil it into the pressure cooker. For boiling the beef, I have added four glasses of water, 1 tablespoon of salt, and turmeric powder. It will take around 40 to 45 minutes to cook the meat in a pressure cooker, keeping the flame on medium.
- Sauté The Onions: Place a pan or wok on the stove and heat the oil in it. Now sauté the onions to light brown. Don’t let the onions get overly charred. Keep the flame low while frying the onions.

- Add Garam Masala & Garlic Ginger Paste: Add the garlic ginger paste to the pan and garam masala, and stir for two minutes on medium flame. All these ingredients will blend and infuse the taste, making the gravy much more flavorful.


- Add Tomatoes: Next, include the tomatoes in the medley. Plus I’m also adding a splash of water so that the tomatoes decompose quickly. Turn the flame to low and let the tomatoes decompose for 2 minutes.

- Bloom Ground Spices: Now it’s time to bloom all the ground spices. After adding the spices, add a few drops of water to prevent them from burning. Give a gentle stir to the gravy, and let it simmer on a medium flame for two minutes. Keep pressing the tomatoes with a spatula to infuse their juice into the gravy.

- Add Beef: Lastly, I’m adding boiled beef to the stew and let it simmer for 8 minutes on a medium flame. Keep stringing the stew over time to mix everything perfectly.

- Garnishing: Now, for garnishing, sprinkle the cilantro and chilies and squeeze some lemons. And there we go. Our recipe is now ready to serve.

Nabeela’s Pro Tips
The first secret behind the successful Bhuna Gosht masala is the tenderness and softness of beef. To make the beef more juicy and soft I have pre-boiled the meat in the pressure cooker, and I prefer this way too.
Contrary to that, if you put raw meat in the pan, it will be time-consuming. Secondly, the raw meat won’t become tender like the pre-boiled meat. That’s why before making Bhuna Gosht, always use boiled beef meat.
Secondly, to make the gravy more colorful and vibrant you must add Kashmiri red chili. This spice will also make your gravy more zesty and spicy.

FAQs
What To Serve With Bhuna Masala?
There is a huge list of side dishes that you can serve with the Bhuna Masala to make it more striking. But keeping things simple, I just prefer to go with the naan, chapati, or roti. Don’t forget the plate of a salad, or Rita.
To make your bites more tangy, you can serve the main dish with mint chutney or Imli paste.
Being rice lovers, my family members love to eat Bhuna masala with pulao or white rice. Along with the rice, the mixed pickles are an even better way to feed your appetite.
Other Meat Recipes

Bhuna Gosht Recipe
Ingredients
- ½ Cup Oil
- 0.6 Kg Beef meat
- 3 Tomatoes
- 1 Onion
- 1 tsp Garlic Paste
- 1 tsp Ginger Paste
- 3 Green chilis
- 1 Lemon
- 2 tsp Turmeric powder (1 for boiling meat and 1 for bhuna)
- 1 tsp Red chili powder
- 1 tsp Kashmiri chili powder
- 1 tsp Salt
- 1 tsp Store-bought ghost masala
- 1 tsp Dry fenugreek
- 1 tsp Dry coriander
- ½ tsp Cumin Powder
- 3-5 Black pepper
- 1 Black cardamom
Instructions
- First, Boil the meat in a pressure cooker. Add 4 glasses of water to the cooker, along with 1 tbsp of turmeric powder and salt. Pressure cook the meat on a medium flame for 45 minutes.
- Heat oil in a pan or wok; sauté onions until light brown. Avoid over-charred; keep the flame low.
- Add garlic-ginger paste and garam masala to the pan. Stir for two minutes on a medium flame for a flavorful blend.
- Add tomatoes to the pan and a splash of water for quick decomposition. Simmer on low flame for 2 minutes.
- Add all the ground spices to the pan, and pour a few drops of water to prevent burning. Stir gently, and simmer on a medium flame for 2 minutes. Press tomatoes with a spatula to infuse their juice into the gravy.
- Finally, add boiled beef to the stew and simmer for 8 minutes on medium flame. Stir regularly to ensure thorough mixing.
- Garnish with cilantro, chillies, and lemon squeeze. The recipe is ready to serve.